Workflows
Context
XM Cloud comes with a sample workflow that should not be used as an actual configuration but as an example of a simple workflow. Workflow helps customers prevent unplanned content from making it to their website without the proper approvals. It also helps maintain consistent quality across all content. Each step in the editing process—such as fact-checking, style alignment, tone consistency, and further reviews ensures that the content meets specific standards.
Execution
Workflow Planning
It's recommended to establish a workflow for all content items. This prevents premature publishing to your production environment, whether done automatically or manually. While the sample workflow is provided, it should only be used as an example or template for designing a workflow that fits your business needs. Maintain simplicity in your workflow. Overcomplicating it with numerous states and review levels can slow the process, resulting in a less effective workflow.
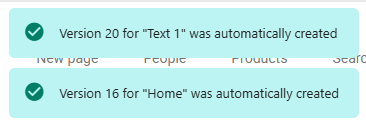
Administrator users bypass workflows and versioning by default. Content authors should not be assigned the admin role as this will impact the content creation process. The following will guide you through the process of creating page and datasource workflows, so that when content authors start editing a component in Page Builder on a previously approved page both component and page will enter workflow and have a new version created, as seen below.
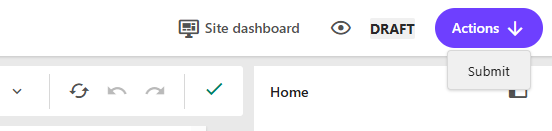
Addtional components changed at this time will also enter workflow. When content authors have finished editing these items can then be submitted and moved through workflow states together directly within Page Builder.
Migration Considerations
If you are currently on XP/XM and migrating to XM Cloud there are some specific considerations that you should consider when making this transition. Two specific focuses that should be considered are any .NET customizations that have been made to affect items controlled by workflow as well as the introduction of webhooks which can allow for new ways to implement workflow. In addition to these considerations, there are existing implementations that should be reviewed and changed based on the information below:
Email Actions should be implemented with a Webhook Submit Action as detailed further down.
Configure Page and Datasource Workflows
Two separate workflows are recommended, one for page items and the other for datasources. By default, Sitecore provides you with the Basic Workflow for page items and the Basic Datasource Worksflow for datasources.
This allows the main page workflow to stay clean and not cluttered. At a minimum this would be a two stage with draft and approved. The Basic Workflow has a Datasource Workflow Action which points to the Approve command on the Basic Datasource Workflow. This is important because it allows you to define the scope which allow datasources like the link list and its child items for example to be moved through the workflow successfully.
Assign Basic Workflow
It's important to configure workflow for both pages and the separate data source component items on a page. To do this:
- Ensure the Standard Values module is installed for your SXA website.
- Navigate to the Content Editor and define your components under the Standard Values item in the SXA website settings folder.
- Right-click on Standard Values and click on Insert > Standard Values to open a dialog.
- Select the Site Collection Templates tab and select required templates.
- For each Site Collection Template, configure the default workflow to use the Basic Workflow.
Assign Basic Datasource Workflow
- In the Content Editor and define your components under the Standard Values item in the SXA website settings folder.
- Right-click on Standard Values and click on Insert > Standard Values to open a dialog.
- Select the Datasource Templates tab and configure any unconfigured templates.
- For each data source component, configure the workflow to use the Basic Datasource Workflow.
If you have followed the Creating New Components recipe and have created a new component by cloning one of the existing OOTB XM Cloud components then all of the necessary configuration should already be in place including base templates.
Note that only templates that have the _PerSiteStandardValues base template assigned to them appear in the dialog box. You can find the base template here: /sitecore/Templates/Foundation/Experience Accelerator/StandardValues/. If for some reason your Site Collection Template or Datasource component does not appear in the dialog box when trying to add standard values this would be the first thing to check. More information available here on the documentation site.
Configuration of component child items
To allow local components with child items to move through the workflow correctly in Page Builder there is an additional base template which need to be assigned to the parent component.
This template should not be added to child items only the parent datasource item.
The _HorizonDatasourceGrouping when present will allow Page Builder to show the Manage Items panel for that datasource and authors can insert child items based on the Insert Options configured in the datasource template.
/sitecore/templates/Foundation/Experience Accelerator/Horizon/_HorizonDatasourceGrouping
If you insert/edit a new child under a parent datasource that uses this template and the parent is in a final workflow state, Sitecore creates a new version of the parent item. This is expected behaviour for publishing consistency.
Configuration of Users/Roles
For each workflow state that requires a specific set of users, create a Sitecore role representing the commands and states this type of user should manage. Assign roles to users rather than configuring permissions for individual users.
Example: Sample Workflow with "Editor" and "Super Editor" Roles
- Editor: Can push an item from Draft to Awaiting Approval.
- Super Editor: Can approve or reject the item.
You can create these roles in the Role Manager and use the Security Editor to apply security settings.
Example rights for Editor
Access Viewer for Editor
As shown, Editors get workflow execution rights, but Approve and Reject actions are specifically denied.
Example rights for Super Editor
Access Viewer for Super Editor
A Super Editor has full workflow execution rights with no restrictions. When an Editor pushes an item, it will stop at Awaiting Approval, while Super Editors can push the item further.
No further workflow options for Editor
Further workflow options for Super Editor
It’s also advised not to assign the Administrator role to content editors, as administrators can override workflow states and interfere with normal operation.
Using Webhooks to Send Notifications
You can now trigger sending emails or notifications via webhooks when an item reaches a specific state in the workflow. Follow the steps below:
-
Create a new Webhook Submit Action under a specific state or command.
-
Example payload sent by the webhook:
-
The webhook sends a
POSTrequest to the specified URL. -
Configure the URL and authorization details for your endpoint.
Insights
So what happens if you start editing multiple components on a page with both the components and page items dropping into workflow with the new versions created? How can this be done without impacting any of the other changes.
When editing is complete from this point forward Explorer can be oppened in context for the hero banner item where this item can then be moved through workflow on its own and then published.
Because the other items modified will not be in the final state in the workflow they will not be published. If snapshot publishing is being used then a layout update will still be sent via Edge to allow on-demand ISR to invalid the page. If this is a new component being added to the page then the layout will need to updated and published for the chnages to come through because the dependency is not available on Edge - refer to the Publishing Optimization recipe for further information on publishing flow.
Related Recipies
Related Documentation
- For recipe suggestions, questions or feedback, please use the form.
- For direct contribution, please create a pull request on the Github repository for review.