Embedding content from Content Hub
Context
Content distribution is the process of making content available to different delivery channels and applications in a consistent, scalable way. When implemented well, a distribution strategy ensures that a single, authoritative source of content can serve many different experiences, formats, and audiences.
For content authors, this means being able to select and embed assets from their DAM directly into their content. Content Hub is being used in this case but the same approach can be used for other DAMs.
The provided code is intended as a guideline and must be tailored to suit your specific implementation requirements. Please ensure thorough end-to-end testing is conducted to validate its functionality and performance in your environment.
Execution
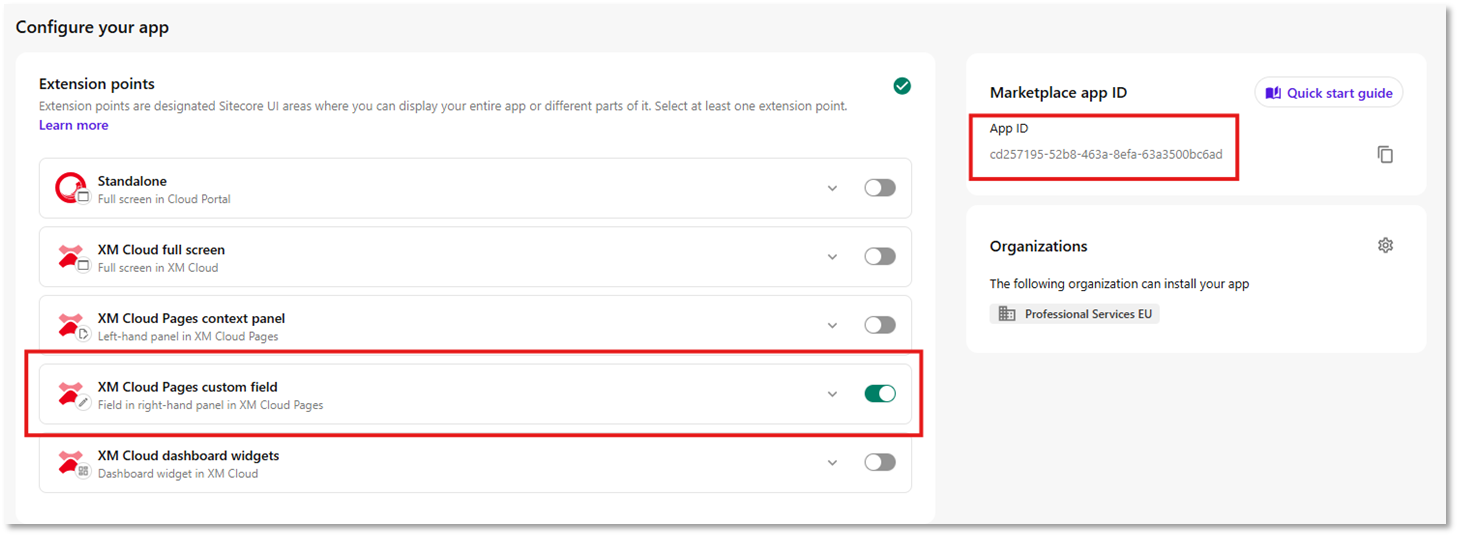
Sitecore Marketplace penables every Cloud Portal organization to build and use applications that add new capabilities to Sitecore. The XM Cloud Page builder custom field extension point lets you extend the data template of a content item or a page by adding your own custom field to it. XM Cloud users can then populate that field with the data you provide in your Marketplace app.
In this case, we have setup up a Marketplace custom field in XM Cloud that connects to your DAM - in this case Content Hub, via a Marketplace app. It enables editors to select and embed published assets directly into Sitecore Page Builder, using GraphQL-powered components for dynamic rendering.
Follow the steps in the documentation to create your Marketplace app for Page Builder custom fields. A dedicated Content Hub page needs to be configured to show only published content. Configuration for this and how to setup the marketplace the code can be seen at the Content Hub Content Distribution recipe.
In XM Cloud create a new component this will need to have a field set to the marketplace type plugin.

The value in the source field above is the App ID and can be obtained when you create your custom Marketplace app. When configuring your app you should select the custom field extension point.
When editors click the field, it opens a Content Hub window via iframe as explained in the Content Hub + XMC recipe and the selected asset’s identifier is returned to XM Cloud using postMessage.
In your XM Cloud solution you will need to create a custom component to perform a GraphQL call to Content Hub. This component will have a datasource to store the value returned from Content Hub in the Marketplace plugin field type as see below.
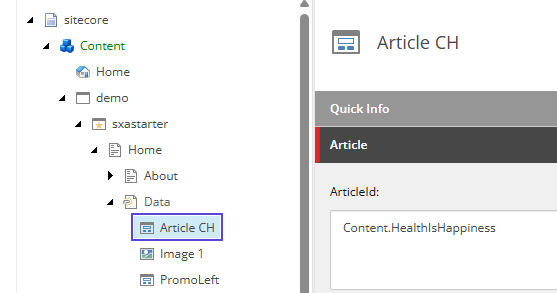
Component-level static data fetching is then used within the component to performa the GraphQL query to retrieve and render content.

See below example for how this component works.
import React, { JSX } from 'react';
import {
  Field,
  GetStaticComponentProps,
  withDatasourceCheck,
  useComponentProps,
} from '@sitecore-jss/sitecore-jss-nextjs';
import { ComponentRendering } from '@sitecore-jss/sitecore-jss-nextjs';
import sanitizeHtml from 'sanitize-html';
type ComponentProps = {
  rendering: ComponentRendering;
};
type ArticleData = {
  id: string;
  title: string;
  body: string;
};
type ArticleContentProps = ComponentProps &
  ArticleData & {
    fields: {
      ArticleId: Field<string>;
    };
    params: { [key: string]: string };
  };
const ArticleContent = (props: ArticleContentProps): JSX.Element => {
  const data = useComponentProps<ArticleData>(props.rendering.uid);
  const id = props.params.RenderingIdentifier;
  return (
    <div className={`component promo ${props?.params?.styles}`} id={id ? id : undefined}>
      {data?.id === 'dummy-id' ? (
        <>
          <h2>Content Hub Article</h2>
          <p>--- Please enter a correct Article ID ---</p>
        </>
      ) : (
        <>
          <div
            dangerouslySetInnerHTML={{
              __html: sanitizeHtml(data?.body || ''),
            }}
          />
          <div dangerouslySetInnerHTML={{ __html: data?.body || '' }} />
        </>
      )}
    </div>
  );
};
export const getStaticProps: GetStaticComponentProps = async (props: ComponentRendering) => {
  const fields = props.fields as { ArticleId: Field<string> };
  const post = await GetPageItem(fields.ArticleId.value);
  return post;
};
export interface PageItem {
  name: string;
  id: string;
}
export async function GetPageItem(articleId: string) {
  const requestBody = {
    query: `
  query {
    blog:m_Content_Blog(id:"${articleId}") {
      id
      date:content_PublicationDate
      title:blog_Title
      body:blog_Body
    }
  }
`,
  };
  try {
    const endpoint =
      process.env.CH_GRAPH_QL_ENDPOINT || 'https://edge-beta.sitecorecloud.io/api/graphql/v1';
    const apiKey = process.env.CH_API_KEY;
    const response = await fetch(endpoint, {
      method: 'POST',
      headers: {
        'content-type': 'application/json',
        ...(apiKey ? { 'x-gql-token': apiKey } : {}),
      },
      body: JSON.stringify(requestBody),
    });
    const jsonResponse = await response.json();
    const post = jsonResponse?.data?.blog ?? { id: 'dummy-id', name: 'dummy-name' };
    return post;
  } catch (error) {
    console.error('Error fetching article data:', error);
    return { id: 'dummy-id', name: 'dummy-name' };
  }
}
export default withDatasourceCheck()<ArticleContentProps>(ArticleContent);
Insights
While the example focuses on blogs, the same approach can be extended to other schemas such as products, campaigns, or events. Implementing your own app, there's a few things that you should also be considering:
- Ensure the Marketplace app has read-only access limited to the schemas and assets required. This reduces the risk of exposing unpublished or restricted content.
- Optimize performance by minimizing over-fetching—tailor GraphQL queries for each component and keep them as shallow as possible.
- Define clear editor-facing fallbacks. For example, when an asset is unpublished, deleted, or if GraphQL fails, editors should see friendly placeholders or warnings instead of raw errors. The current dummy-id approach is a good start but can be expanded.
- The current recipe demonstrates embedding a single asset, but some use cases may benefit from multi-asset selection (e.g., carousels, galleries, or related article lists).
- Add telemetry and adoption tracking to monitor how frequently editors use the Marketplace custom field. This data can help guide future UX and feature improvements.
Related Recipes
Related Documentation
- For recipe suggestions, questions or feedback, please use the form.
- For direct contribution, please create a pull request on the Github repository for review.