Project Solution Setup
Context
As the technical lead on the project, you need to set up the Project and Environment(s) in the customer portal, as well as a source code repository, so that the project developers can start implementing the client project, commit, and deploy their code.
Execution
There are two paths to setup the solution, depending on whether you are using a source code provider with a supported integration to the XM Cloud Deploy app or not. In the following use case we will focusing on GitHub, but Azure DevOps steps are available in the source control and hosting providers documentation.
Setting up your first Project, Environment, and Site - Supported Integration
In the process of creating a new Project, you connect a GitHub Repository. Make sure you grant following access rights:
- Read access to metadata
- Read and write access to administration and code
- Access to all repositories
If granting those permissions is against your organization’s security policies, follow the “No Integration” steps to setup the project. The Project and Environment creation process requires these to copy a GitHub project to your private or company repository.
In the setup process the project requires a name. Make sure to use proper Naming conventions in case your license allows to have to more than one project or your are planning more projects in the future. Similarly, when creating the first environment you will choose the name of the environment, make sure you are using a standard Naming convention.
Each environment needs to be setup to be a production or non-production environment. So it’s crucial to mark only the production environment accordingly and your QA and UAT environment as non-productions. Give the environments applicable names.
Starting from March 3, 2025, XM Cloud released a feature that allows to build and deploy environment and editing host separately. That means source code for authoring environment and head application can be stored in separate repositories. To enable the feature, follow the Deploy documentation.
Setting up your first Project, Environment, and Site - No Integration
When creating a project with no integration, you will need to use the Sitecore Cloud CLI.
-
Login to the XM Cloud Deploy App using the CLI
-
Create a project providing name of the project and the region where this should be created
-
Create an environment within that project passing the project ID of the previously created project and the environment name
-
Deploy to your environment using the environment id. This will provision the different XM Cloud resources, build and deploy the foundation head solution and run post actions.
-
Fork the Foundation Head repository (for Next.js or for ASP.NET Core) into your source control
-
Deploy your custom solution using the environment ID and the upload parameter. Make sure to run this command from your solution root. Note: the deployment log can be followed live in the deploy app.
Create a new Site
Once the process of provisioning the CM resources, and deploying your code and first items to the XM Cloud environment is done, you need to access the dashboard. From here you will create your first site.
For a client project, create an empty site - follow the Creating a Site recipe for further detail.
Walk through the Solution
As mentioned earlier, it is required to start using the foundation head solution. This can be either cloned during the project creation process or forked separately.
The solution contains everything to run XM Cloud locally using Docker Containers as well as running the head application locally connecting towards the GraphQL Preview Endpoint.
Don't try and force Helix into your front-end JavaScript application.
Helix is a set of project structure and dependency management principles that was very helpful when Sitecore XM/XP implementations were done entirely in back-end code. Helix is less useful in front-end projects built with JavaScript frameworks. Front-end projects are better off following the project structure best practices published by the front-end framework owners.
For ASP.NET Core, Helix might still be useful since most development is done in Visual Studio.
Items Serialization
The items folder contains serialized versions of the items coming from XM Cloud. Those items are stored in yml format and organized based on the item hierarchy and the configuration in the module.json files.
Check out the Setup Sitecore Content Serialization recipe for more details.
Platform
The platform folder can contain customizations you want to add to the XM Cloud content management instance. It is not recommended to do customizations.
Next Steps
Using .env.template
- Rename
.envto.env.templatein your solution root - remove confidential data from
.env.template - Set
.envto be ignored by git in.gitignorefile - update
init.ps1to copy.envfrom.env.templatebefore any of the env variables are set
Based on your framework, rename the project accordingly -
Insights
Structure in XM Cloud
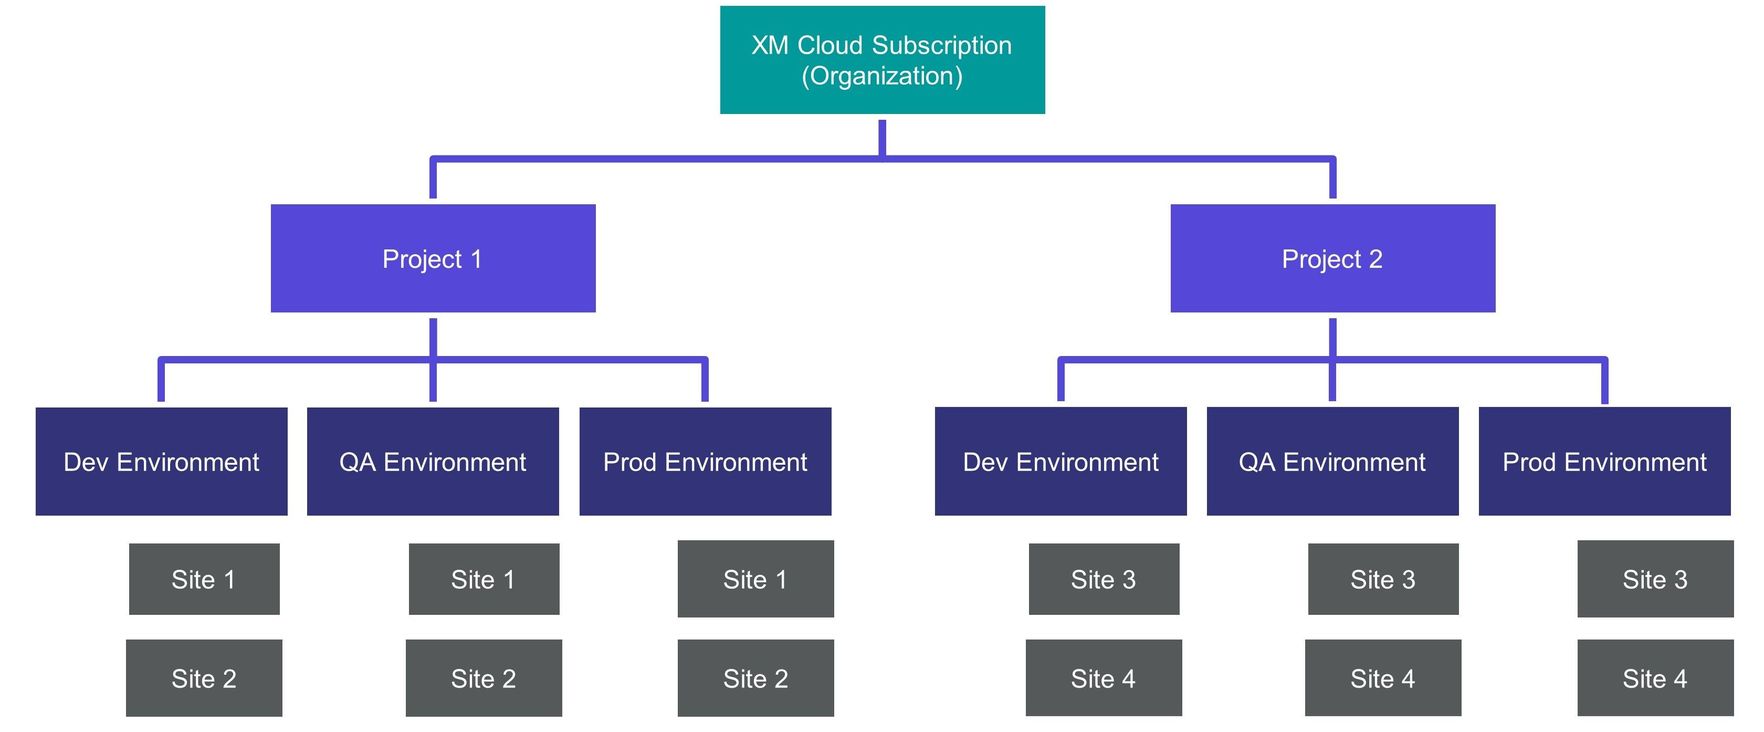
When starting in XM Cloud the overall structure needs to be understood. When getting access to the Sitecore Composable DXP through the Sitecore Cloud Portal you’ll be part of an Organization that contains the subscription. Depending on the licensing model of your subscription you’ll be able to create and manage 1 to many XM Cloud projects each one containing 1 to many XM Cloud environments.
When to use Site Collections, Site Collection Folders and Site Folders
XM Cloud is made for multisite implementations. Dependent on the amount of sites you have and the requirements for separation, XM Cloud helps you to organize and manage sites in a hierarchical way.
Every site requires to be within a Site Collection. The Site collection can be seen as a brand folder. But the site collection is not only good for separating and organizing your sites, but also provides certain features. You can share content from one site to another within a site collection. You can create internal links between sites. Sites within a site collection share the same page templates.
If you need content separation you can create a dedicated site collection.
Review the Site Management and Multisite Architecture recipes for further details on how to setup the best multi-site setups.
Related Recipes
Related Documentation
- For recipe suggestions, questions or feedback, please use the form.
- For direct contribution, please create a pull request on the Github repository for review.