Content distribution from Content Hub to XM Cloud
Context
Content distribution is the process of making content available to different delivery channels and applications in a consistent, scalable way. When implemented well, a distribution strategy ensures that a single, authoritative source of content can serve many different experiences, formats, and audiences. This means structuring content so it can be queried and rendered wherever it’s needed, from websites and mobile apps to third-party integrations, without duplicating or manually managing data in multiple places.
Execution
Content Hub excels at being the hub for all content within an organisation, it can be used to manage the authoring flows and distribution across multiple channels. Connecting this with XM Cloud, will allow you to create a distribution strategy to speed up time to market and ensure consistency across the board.
As in the Distribution of Content recipe we will be focusing on blogs within the “Content” entity, but the approaches covered are equally applicable for other content types, such as Product data, reports or documentation.
We will walk through three scenarios:
- Instant Blog Lists – Display a list of blogs on a page through a Marketplace-powered component to fetch and render blogs from Content Hub.
- Dedicated Blog Without Duplication – On a specific dedicated page, pull directly from Content Hub with no extra authoring overhead.
- Display a Specific Blog – Place any Content Hub item into any XM Cloud page, no manual syncing.
The following guide walks through the process of configuring content within Content Hub for distribution via Experience Edge and querying it from a react component using GraphQL. Integration with XM Cloud will be done through Marketplace, review Insights below for further information.
Implementation
Whilst it may be tempting, especially if you have previously worked with XM/XP, to want to now find a way to create an item in XM Cloud for every blog in Content Hub, but in our experience trying to do this can lead to difficulties in aligning workflows between Content Hub and XM Cloud, ensuring content is appropriately synchronised, and a difficult user experience for content authors - not to mention difficulties in maintenance. A much better approach, is to retrieve the content directly in the head application from Experience Edge for Content Hub. In scenario one and scenario two, this means that XM Cloud is not involved, and in the third scenario it only needs to know the blog’s id rather than it’s full content.
1. Displaying a List of Blogs on a Page
To display a list of blogs on a page, you should create a 'blogs list' component:
2. Displaying a specific blog on a dedicated page
This scenario essentially covers the case of a blog page. Here we can create a blog component, which takes as a parameter, the id of the blog to retrieve from Content Hub.
import React, { useEffect, useState } from 'react';
import { executeContentHubQuery } from 'lib/content-hub/helpers';
import { Field } from '@sitecore-jss/sitecore-jss-nextjs';

interface Blog {
  id: string;
  title: string;
  body: string;
}

interface Fields {
  BlogId: Field<string>;
}

export type BlogDetailProps = {
  params: { [key: string]: string };
  fields: Fields;
};

export const Default = (props: BlogDetailProps): JSX.Element => {
  const query = `{ blog:m_Content_Blog(id:"${props.fields.BlogId}")
  { id date:content_PublicationDate title:blog_Title body:blog_Body } }`;
  const [blog, setBlog] = useState<Blog>();

  useEffect(() => {
    (async () => {
      const data = await executeContentHubQuery(query);
      setBlog(data.blog);
    })();
  }, []);

  return blog ? (
    <article>
      <h1>{blog.title}</h1>
      <p>{blog.body}</p>
    </article>
  ) : (
    <p>Loading...</p>
  );
};
This component can then be added to a wildcard page, which can take the identifier of the blog (or some other unique property), from the url and use that as a parameter into the component.
3. Displaying a specific blog on a specific page
This use case is essentially the scenario where a specific blog item should be added to a page such as the home page. This could also be used to assign other content types, such as a promo content item to a banner, or some generic text content, such as an about us paragraph to the about us page.
For this, we can reuse the component from the earlier scenario, but as we want to add this to a specific page the identifier of the blog should come from a field on the component rather than the URL.
At this point, the solution is functionally complete, but the user experience here is not great.
Insights
By pairing XM Cloud with Marketplace extensions, content flows directly from the source, authoring becomes visual, and your platform evolves without costly rebuilds and avoid a whole category of synchronisation and workflow issues. But the last scenario (displaying specific content on a specific page) exposes a potential UX gap: how do we make this feel native and simple for authors working in Pages?
This is where the XM Cloud Marketplace comes into play. By creating a custom field extension, we can allow authors to select content from Content Hub in a more intuitive, visual way without needing to understand identifiers or manually configure fields.
To achieve this, we configure a dedicated Content Hub page to show only published blog content, filtering by:
- Definition:
M.Content - Relation:
ContentTypeToContentequalsBlog - Property:
PublishStatusequalsPublished
On this page, we use a search component with its main click operation set to External component action. When an author selects an item, the external component sends a postMessage back to the parent frame with the blog’s identifier.
The follow logic is used by the external component (implemented as a module for the External Components Starter):
import { IModuleProps, ModalOperationConfig } from "@/lib/types";

export default ({ options, entity }: IModuleProps) => {
  const okButtonConfig: ModalOperationConfig = {
    name: "ok",
    id: "ok",
    label: "Select entity",
    displayType: "primary",
    onClick: () => {
      const message = { entityId: options.entityId,
      identifier: entity?.systemProperties.identifier, culture: options.culture };
      console.log("Posting message", message);
      window.parent.postMessage(message, "*");
    },
  };
  const cancelButtonConfig: ModalOperationConfig = {
    name: "cancel",
    id: "cancel",
    label: "Cancel",
  };

  if (options.setModalOperations) options.setModalOperations([okButtonConfig, cancelButtonConfig]);
  return "";
};
On the XM Cloud side, the custom field extension receives that message and stores the identifier in the field value, closing the loop. This allows us to provide Content Authors a visual, one-click selection experience and move away from a tedious manual process.
"use client";

import { ClientSDKContext } from "@/features/client-sdk/contexts/ClientSDKContext";
import { Box, Button, Flex, Spacer, Stack } from "@chakra-ui/react";
import { useState, useEffect, useContext, useCallback } from "react";

const CH_BASE_URL = "";
const CH_CONTENT_PAGE = `${CH_BASE_URL}/en-us/content-connector/approved-blogs`;

export default function ContentHubEntityCustomField() {
  const [entityIdentifier, setEntityIdentifier] = useState<string>();

  const client = useContext(ClientSDKContext);

  const updateValue = useCallback(
    async (identifier?: string) => {
      setEntityIdentifier(identifier);
      await client?.setValue(identifier ?? "", true);
    },
    [client]
  );

  useEffect(() => {
    if (!client) return;
    const getValue = async () => setEntityIdentifier(await client?.getValue());
    getValue();
  }, [client]);

  useEffect(() => {
    const receiveMessage = async (event: MessageEvent) => {
      if (event.origin !== CH_BASE_URL || !event.data) return;
      await updateValue(event.data.identifier);
      client?.closeApp();
    };
    window.addEventListener("message", receiveMessage, false);
    return () => {
      window.removeEventListener("message", receiveMessage);
    };
  }, [client, updateValue]);

  return (
    <Stack spacing={4} padding={4} height='100dvh'>
      <Flex alignItems='center' gap={2}>
        <Box fontWeight='medium'>Item:</Box>
        <Box>{entityIdentifier}</Box>
        <Spacer />
        <Button size='sm' variant='outline' onClick={() => updateValue()}>
          Remove
        </Button>
      </Flex>
      <iframe src={CH_CONTENT_PAGE} height='100%' title='Content Hub'></iframe>
    </Stack>
  );
}
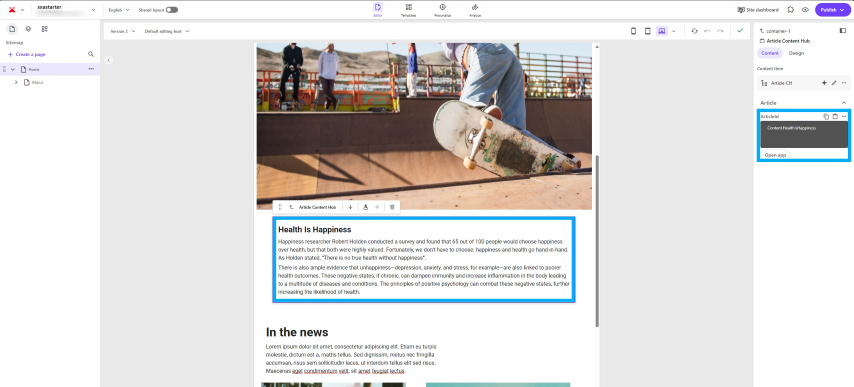
Here you can see both extensions in place. The custom component, and custom field marketplace extension point are marked in blue below:
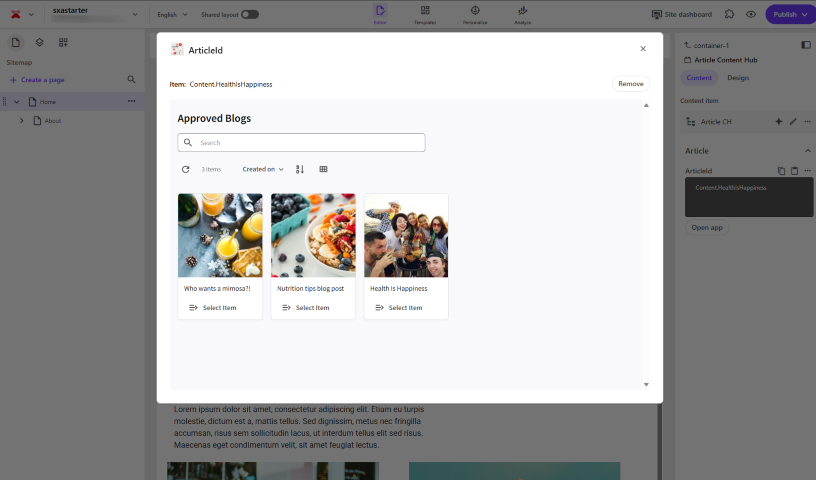
Once the “Open app” button is clicked, a dialog box opens. This contains the XM Cloud marketplace extension, which is rendering an iframe showing the page we created in Content Hub. This page has the search component, with each item showing the external component action we added. Selecting one of the content items from the dialog will update the article id within the component in Pages, allowing it to render that content.
On the XM Cloud side a custom component is needed which uses component-level data fetching to perform a GraphQL query using the blog indentifier returned to the custom field.
query {
    blog:m_Content_Blog(id:"${articleId}") {
      id
      date:content_PublicationDate
      title:blog_Title
      body:blog_Body
    }
  }
As mentioned earlier, we have focussed on examples of blog content here, but the approach is equally viable for other content entities or use cases.
Related Recipies
Related Documentation
- For recipe suggestions, questions or feedback, please use the form.
- For direct contribution, please create a pull request on the Github repository for review.